はじめに
モデル2(MVC)アーキテクチャを学んだ後は、次に「フロントコントローラーパターン」という重要な設計パターンを理解する必要があります。フロントコントローラーパターンとはすべての画面の入り口を1つにまとめる仕組みです。これまでのMVC2は各ページ専用のコントローラーを複数使います。両者の違いは「窓口が1つか、複数か」という点です。
フロントコントローラーパターンとは
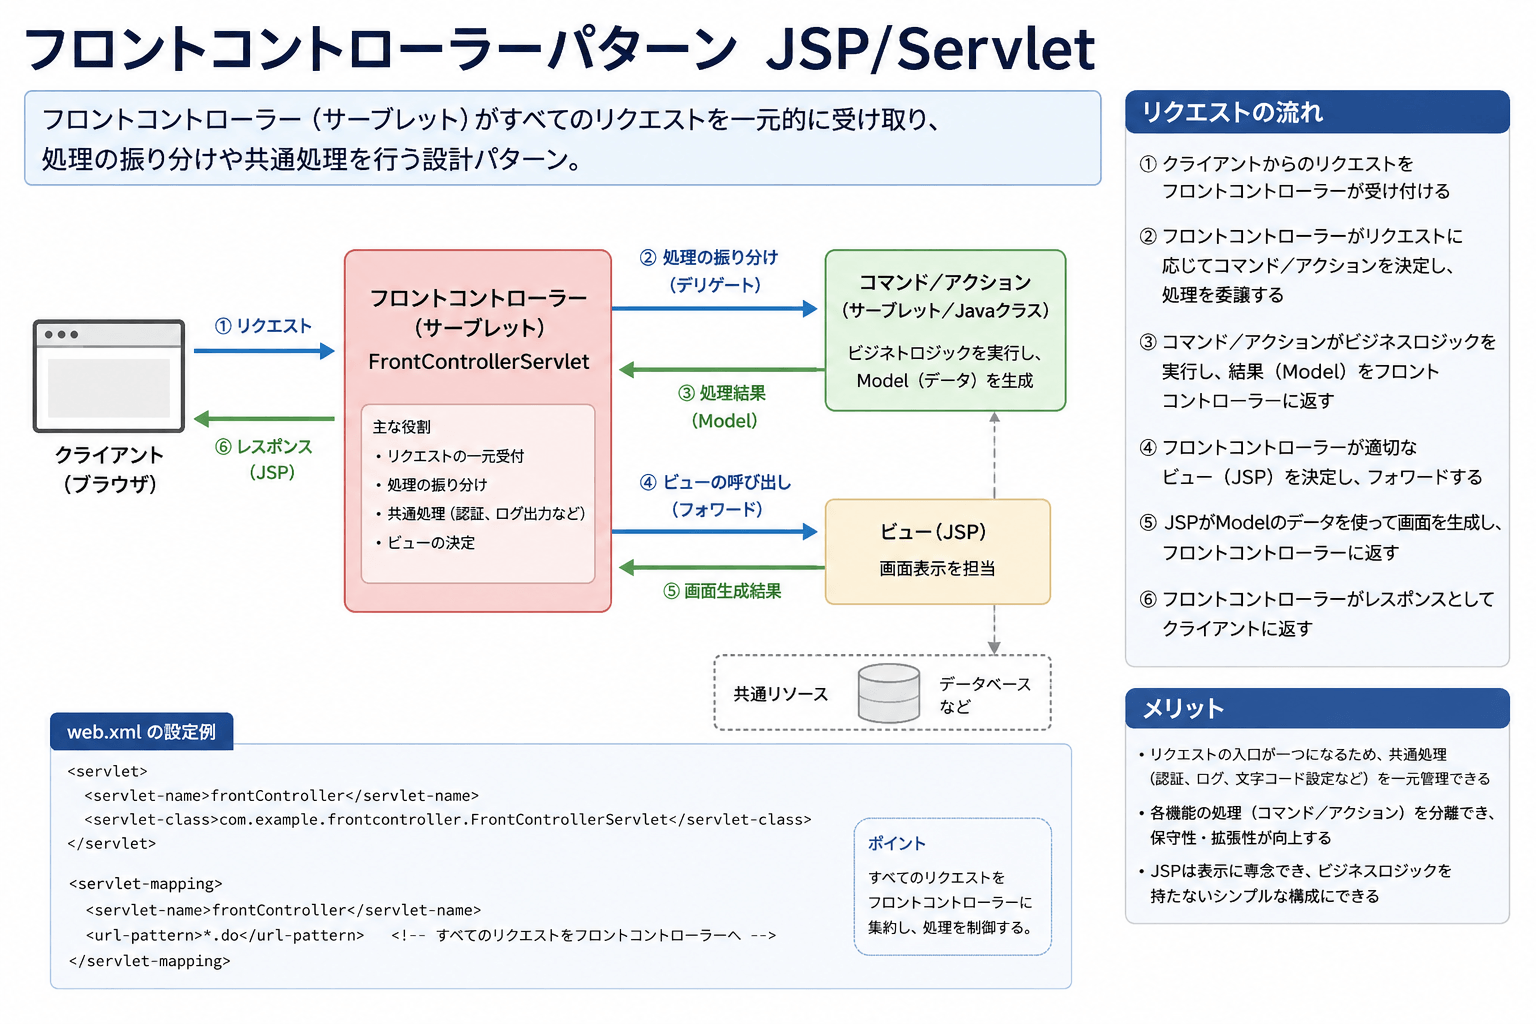
フロントコントローラーパターンは、すべてのリクエストを単一のコントローラーで受信し、適切なハンドラーに振り分ける設計パターンです。基本的なMVCモデルをさらに発展させたもので、大規模アプリケーション開発において以下のメリットを提供します。
従来のモデル2 vs フロントコントローラー
| 特徴 | 従来のモデル2 | フロントコントローラー |
|---|---|---|
| コントローラー数 | 複数(機能ごと) | 1つ(中央集権型) |
| 共通処理 | 各コントローラーで重複 | 一箇所で集中管理 |
| リクエストルーティング | URLごとに設定 | 内部で動的に決定 |
| 拡張性 | やや制限あり | 高い |
| 設定の一元化 | 分散 | 集中管理 |
小規模開発では従来モデルでも十分ですが、拡張性・保守性を重視するならフロントコントローラーパターンが優位です。特にチーム開発や長期的なプロジェクトでは、後者の採用が推奨されます。
フロントコントローラーの核心コンポーネント
フロントコントローラーパターンは、Webアプリケーションにおけるリクエスト処理を一元管理する設計手法です。その核心は四つのコンポーネントで構成されます。
Front Controller – 全リクエストのエントリーポイント
まずフロントコントローラが全てのクライアントリクエストを受け付ける唯一の入り口となります。
Dispatcher – リクエストを適切なコマンドに振り分け
続いてディスパッチャがリクエストの内容を解析し、どの処理に割り当てるべきかを判断します。
Command – 実際のビジネスロジックを実行
ディスパッチャによって選択されたコマンドは、実際のビジネスロジックやデータベースアクセスといった主要な処理を担当し、その実行結果を元に次に表示すべき画面を決定します。
View – 表示を担当(JSP)
最後にビューがユーザーへ返すHTMLレスポンスの描画を担い、この役割は通常JSPが受け持ちます。このように各コンポーネントが明確に役割分担することで、処理の流れが整理され、コードの重複が排除され、システム全体の保守性と拡張性が大きく向上するのです。
基本実装:シンプルなフロントコントローラー
フロントコントローラーServlet (FrontControllerServlet.java)
フロントコントローラーパターンの実装例であり、単一のサーブレットが全リクエストを一括処理します。
@WebServlet(“/*”)によって全てのURLパターンがこのサーブレットにマッピングされ、アプリケーションの唯一の入り口として機能します。
initメソッドでは起動時にコマンドオブジェクトをURLパスと対応付けてMapに格納し、リクエストごとにマッピング検索の手間を省いています。serviceメソッドではリクエストURLのパス情報を取得し、対応するコマンドをMapから取得します。
該当コマンドが存在しない場合は404エラーを返し、存在する場合はcommand.executeを呼び出してビジネスロジックを実行させます。
executeメソッドの戻り値として次に表示すべきJSPのパスを受け取り、RequestDispatcherを使ってフォワードすることで、コントローラとビューの役割を明確に分離しています。この設計により共通処理の集中管理や新機能追加の容易さが実現されています。
@WebServlet("/*")
public class FrontControllerServlet extends HttpServlet {
    private Map commands;

    @Override
    public void init() {
        commands = new HashMap<>();
        // コマンドの登録
        commands.put("/user/list", new ListUsersCommand());
        commands.put("/user/add", new AddUserCommand());
        commands.put("/product/list", new ListProductsCommand());
        // 他のコマンド...
    }

    protected void service(HttpServletRequest request, HttpServletResponse response)
            throws ServletException, IOException {

        String path = request.getPathInfo();
        Command command = commands.get(path);

        if (command == null) {
            response.sendError(HttpServletResponse.SC_NOT_FOUND);
            return;
        }

        String viewPath = command.execute(request, response);
        RequestDispatcher dispatcher = request.getRequestDispatcher(viewPath);
        dispatcher.forward(request, response);
    }
}
Commandインターフェース (Command.java)
このインタフェースはフロントコントローラーパターンにおけるコマンド層の核であり、すべてのビジネスロジッククラスが実装すべき契約を定義します。executeメソッドはHTTPリクエストとレスポンスを受け取り、処理を実行した後に次に表示するビューのパスを文字列で返却します。
これによりコントローラは具体的な処理内容を知らずに、単にexecuteを呼び出して結果のJSPパスを受け取るだけで良くなり、処理の委譲とビュー選択の責任を明確に分離できます。
public interface Command {
    String execute(HttpServletRequest request, HttpServletResponse response)
        throws ServletException, IOException;
}
また、サーブレットAPIに依存しつつも、実装クラスは継承ではなく実装を用いるため、単体テストが容易で拡張性にも優れた設計となっています。
具体的なコマンド実装 (ListUsersCommand.java)
このクラスはCommandインタフェースの具体的な実装であり、ユーザー一覧表示という特定のビジネス要件を担当します。executeメソッド内ではUserServiceを呼び出して全ユーザーデータを取得し、その結果をリクエストスコープに属性として格納することで、後続のJSPがデータにアクセスできるようにしています。
戻り値として返却する文字列は画面描画を担当するJSPのパスであり、/WEB-INF/views/ディレクトリ配下に配置することでクライアントからの直接アクセスを防止し、セキュリティを確保しています。
public class ListUsersCommand implements Command {
    private UserService userService = new UserService();

    public String execute(HttpServletRequest request, HttpServletResponse response) {
        List users = userService.getAllUsers();
        request.setAttribute("users", users);
        return "/WEB-INF/views/user/list.jsp";
    }
}
このようにコマンドクラスはプレゼンテーション層とビジネスロジック層の橋渡し役に徹しており、データの準備と遷移先の決定という責務に集中することで、可読性と保守性の高いコードを実現しています。
高度な実装:リフレクションを利用した動的コマンド実行
より洗練された実装として、リフレクションを使用してコマンドを動的に生成する方法があります。
改良版フロントコントローラー
フロントコントローラーの別実装であり、リクエストパスから動的にコマンドクラスを生成するリフレクション方式を採用しています。Mapを使った明示的な登録の代わりに、パス情報を元にクラス名を組み立て、Class.forNameで該当クラスをロードしてインスタンス化することで、コマンド追加時の設定変更が不要になります。
具体的には”/user/list”というパスに対して”com.example.web.command.ListUsersCommand”のように変換されます。この方式はコマンドクラスの命名規則に依存する反面、設定ファイルや登録コードの管理が省けるという利点があります。
クラスが存在しない場合は404エラーを返し、その他の例外はサーブレット例外としてラップして呼び出し元に伝播させています。ただし、リクエストごとにリフレクション処理が発生するため、Map方式と比較してパフォーマンス面では若干劣り、また実行時エラーが発生しやすいというトレードオフも理解しておく必要があります。
@WebServlet("/*")
public class FrontControllerServlet extends HttpServlet {

    protected void service(HttpServletRequest request, HttpServletResponse response)
            throws ServletException, IOException {

        String path = request.getPathInfo();
        String commandClassName = "com.example.web.command." +
            Character.toUpperCase(path.charAt(1)) + path.substring(2) + "Command";

        try {
            Class commandClass = Class.forName(commandClassName);
            Command command = (Command) commandClass.newInstance();

            String viewPath = command.execute(request, response);
            RequestDispatcher dispatcher = request.getRequestDispatcher(viewPath);
            dispatcher.forward(request, response);

        } catch (ClassNotFoundException e) {
            response.sendError(HttpServletResponse.SC_NOT_FOUND);
        } catch (Exception e) {
            throw new ServletException("Error processing request", e);
        }
    }
}
フロントコントローラーのメリット
フロントコントローラーパターンの最大の利点は、Webアプリケーションに横断的に必要となる共通処理を一箇所に集中管理できる点にあります。
具体的には認証や認可によるアクセス制御、すべてのリクエストに対するロギング、データベース操作におけるトランザクション管理、そして予期せぬエラーが発生した際の統一的な例外処理などが、コントローラ層で一括して実装可能となります。
この集中管理により、すべてのリクエストが同じパイプラインを経由して処理されるため、処理の流れに一貫性が生まれ、システム全体の振る舞いを予測しやすくなります。
さらにルーティングに関する設定も一箇所に集約されるため、URL設計の変更や新たなエンドポイントの追加も容易に行えます。
そして何より、新しい機能を追加する際には既存のコードに影響を与えずにコマンドクラスを増やすだけで済むため、システムは柔軟に拡張し続けることができ、長期的な保守性と開発生産性の向上に大きく貢献します。
共通処理の実装
認証チェックの追加
このコードはフロントコントローラにおける認証フィルタリングの実装例であり、共通処理の集中管理を具体的に示しています。serviceメソッド内でリクエストが認証を必要とするかどうかを判定し、未認証の場合はログインページへリダイレクトすることで、個々のコマンドクラスに認証ロジックを実装する手間を省いています。
requiresAuthenticationメソッドは公開パスやログインエンドポイントを除外するためのルールを定義し、isAuthenticatedメソッドはセッションにユーザー情報が格納されているかを確認して認証状態を検証します。
protected void service(HttpServletRequest request, HttpServletResponse response)
        throws ServletException, IOException {

    // 認証が必要なリクエストかチェック
    if (requiresAuthentication(request) && !isAuthenticated(request)) {
        response.sendRedirect("/login");
        return;
    }

    // 通常の処理
    super.service(request, response);
}

private boolean requiresAuthentication(HttpServletRequest request) {
    String path = request.getPathInfo();
    return !path.startsWith("/public") && !path.equals("/login");
}

private boolean isAuthenticated(HttpServletRequest request) {
    HttpSession session = request.getSession(false);
    return session != null && session.getAttribute("user") != null;
}
このように認証処理をコントローラの前段で一括実施することで、認証漏れを防ぎ、セキュリティポリシーの変更があった場合でも修正箇所はこの一箇所のみで済むため、保守性が大幅に向上します。
なおsuper.serviceを呼び出す前に認証チェックを行うことで、認証が必要な全リクエストに対して確実に共通のセキュリティ対策が適用されるという強固な設計が実現されています。
例外処理の統一
このコードはフロントコントローラにおける例外処理の一元管理を示す実装例です。serviceメソッド全体をtry-catchブロックで囲み、コマンド実行中に発生する可能性のあるすべての例外を一箇所で捕捉しています。
ビジネス例外が発生した場合はエラーメッセージをリクエスト属性に格納し、専用のエラーページへフォワードすることでユーザーに分かりやすいフィードバックを提供します。予期しないシステム例外が発生した場合はログに詳細を記録した上で500エラーを返し、クライアントには内部的なエラー情報を開示しないよう配慮されています。
protected void service(HttpServletRequest request, HttpServletResponse response)
        throws ServletException, IOException {

    try {
        super.service(request, response);
    } catch (BusinessException e) {
        request.setAttribute("error", e.getMessage());
        request.getRequestDispatcher("/WEB-INF/views/error/businessError.jsp")
               .forward(request, response);
    } catch (Exception e) {
        log.error("Unexpected error", e);
        response.sendError(HttpServletResponse.SC_INTERNAL_SERVER_ERROR);
    }
}
このように例外処理をコントローラ層に集約することで、個々のコマンドクラスはビジネスロジックに専念でき、エラーハンドリングの重複コードが排除されるとともに、システム全体で一貫したエラー応答ポリシーを適用できるという大きなメリットが得られます。
フロントコントローラーと既存MVCの統合
既存のモデル2アプリケーションをフロントコントローラーに移行する手順は以下の通りです。
既存ServletをCommandに変換
既存のServletをCommandクラスへ移行することで、リクエスト処理を役割ごとに分離し、保守性や拡張性を向上させることができます。
   // Before
   @WebServlet("/user/list")
   public class UserListServlet extends HttpServlet { ... }

   // After
   public class UserListCommand implements Command { ... }
共通処理の抽出
認証チェックやロギング、データベース接続管理などの共通処理をまとめることで、コードの重複を減らし、一貫した処理を実現できます。
- 認証チェック
- ロギング
- データベース接続管理
ビュー管理の一元化
すべてのJSPを/WEB-INF/views/配下へ配置することで、ブラウザからの直接アクセスを防ぎ、Controller経由でのみ画面を表示できる安全な構成になります。
- すべてのJSPを/WEB-INF/views/以下に移動
- 直接アクセスを防止
フロントコントローラーの発展形
リクエストマッピングの外部化
このコードはXML設定ファイルを用いてコマンドのマッピングを外部化する手法を示しており、ハードコーディングされたMap登録やリフレクションによるクラス名推測方式と比較して、より柔軟で保守性の高いアプローチです。
<!-- commands.xml -->
<commands>
    <command path="/user/list" class="com.example.web.command.UserListCommand"/>
    <command path="/user/add" class="com.example.web.command.UserAddCommand"/>
</commands>
commands.xmlにパスと対応するコマンドクラスのペアを定義しておき、サーブレットのinitメソッドなどでこのファイルを読み込んで動的にマッピングを構築します。XMLパースにはJava標準のDOM APIを使用し、commandタグを取得してpath属性とclass属性を抽出した後、Class.forNameでクラスをロードしてインスタンス化し、Mapに格納しています。
// 設定ファイルから読み込み
DocumentBuilderFactory factory = DocumentBuilderFactory.newInstance();
DocumentBuilder builder = factory.newDocumentBuilder();
Document doc = builder.parse(new File("commands.xml"));

NodeList nodes = doc.getElementsByTagName("command");
for (int i = 0; i < nodes.getLength(); i++) {
    Element element = (Element) nodes.item(i);
    String path = element.getAttribute("path");
    String className = element.getAttribute("class");
    commands.put(path, (Command)Class.forName(className).newInstance());
}
この方式の利点は、マッピングの変更や新規コマンドの追加がコード修正を伴わずXML編集だけで済むことであり、運用中の柔軟性が格段に向上します。また、複数の環境で異なるマッピングを持たせることも容易になるため、大規模なプロジェクトや環境差分を考慮すべきシステムにおいて特に有効な設計パターンと言えます。
アノテーションベースのルーティング
このコードはアノテーションを利用してコマンドクラスを自動検出し登録する最新の手法を示しています。@CommandMappingアノテーションで各コマンドに対応するURLパスを宣言的に指定し、Reflectionsライブラリなどのクラスパススキャンツールを用いてアノテーションが付与されたクラスを自動収集します。
@CommandMapping("/user/list")
public class UserListCommand implements Command {
    // ...
}
収集したクラスからアノテーションの値を取得してマッピングを構築するため、XML設定ファイルすら不要になり、開発者はアノテーションを付けてクラスを作成するだけで自動的にルーティングが機能するようになります。
この方式は設定ファイルの管理コストを削減し、新規コマンド追加の手間を最小限に抑えると同時に、コードと設定が同一ファイル内に同居するため可読性も向上します。
// アノテーションをスキャンして自動登録
Reflections reflections = new Reflections("com.example.web.command");
Set> annotated = reflections.getTypesAnnotatedWith(CommandMapping.class);

for (Class clazz : annotated) {
    CommandMapping mapping = clazz.getAnnotation(CommandMapping.class);
    commands.put(mapping.value(), (Command)clazz.newInstance());
}
Spring MVCなどの現代的なフレームワークでも採用されているこのアプローチは、プロジェクトの規模が大きくなるほどその威力を発揮し、開発体験と保守性を飛躍的に高めることができます。
フレームワークとの関係
現代的なJava Webフレームワークの多くは、内部でフロントコントローラーパターンを採用しています。
Spring MVC - DispatcherServletがフロントコントローラー
Spring MVCでは、DispatcherServletがフロントコントローラーとしてすべてのリクエストを受け取り、適切なControllerへ処理を振り分けます。
@Controller
public class UserController {
    @GetMapping("/user/list")
    public String listUsers(Model model) {
        model.addAttribute("users", userService.getAllUsers());
        return "user/list";
    }
}
Struts - ActionServletがフロントコントローラー
Strutsでは、ActionServletがフロントコントローラーの役割を担い、受け取ったリクエストを対応するActionクラスへ振り分けて処理します。
Jakarta MVC - JAX-RSベースの実装
Jakarta MVCはJAX-RSをベースとしたMVCフレームワークです。HTTPリクエストをControllerへルーティングし、ビューと連携してWebアプリケーションを構築できます。
ベストプラクティスと注意点
適切なスコープ設計
- リクエストスコープ: コマンド間で共有しないデータ
- セッションスコープ: ユーザー固有のデータ
- アプリケーションスコープ: 全ユーザーで共有するデータ
スレッドセーフティの確保
- Commandオブジェクトはステートレスに設計
- 共有リソースへのアクセスは同期化
パフォーマンス考慮
- コマンドオブジェクトのプーリング
- 重い初期化はコントローラー初期化時に行う
セキュリティ対策
- すべてのリクエストを通過するため、セキュリティチェックは慎重に
- CSRF対策の実施
- XSS対策の実施
まとめ
フロントコントローラーパターンは、Java Webアプリケーションのアーキテクチャを次のレベルに引き上げる強力な設計パターンです。このパターンを習得することで、以下のようなメリットが得られます。
- より構造化されたコードベース
- 共通機能の集中管理
- 一貫性のあるリクエスト処理
- より良い保守性と拡張性
最初は少し複雑に感じるかもしれませんが、小さなプロジェクトから始めて徐々に慣れていくことをお勧めします。フロントコントローラーをマスターすると、Spring MVCなどの現代的なフレームワークの内部動作も自然に理解できるようになります。